5 Great Project Ideas for Science Fair
B 5 great projects for knowledge fair Idea o Important advice
We have many readers with project ideas to display at science fairs He wants advice. Basically students Regular schools for the purpose of encouraging science, Hundreds of science fairs are being organized in colleges and universities. These science fairs have various science related events As well as science related papers if students want, Can make and display projects and posters.However, in this case, if you do the project / paper / poster according to some rules Its quality is much better and the chances of being selected as the best also increase. In addition to the project, papers and posters can be displayed in the science fair, but in today's article 5 great fun but easy for just discussing projects and science fairs Ideas for creating science projects will be given. As well as some important adviceThere will be which if followed will make it easier to succeed in science fairs.To use.
Project IdeasBelow are the ideas of 5 projects and necessary directions. Each project can be further improved by research. Presenter required If you think you can present these projects under different names ( E.g. walking power, walking power pad, earthquake alarm Machines, phone-o-amps etc. )Science Project - 1 - Conversion of pressure energy into electrical energyThis project can be done in two ways.To make a mechanical device from which a lever comes out If that lever is pressed, the shaft of a dynamo will rotate, As a result electricity will be generated. However, there is a problem with this method, in the device There will be several mechanical parts, so the chances of damage will increase. The following animation figure is a preliminary concept of generating electricity under such foot pressure Given-

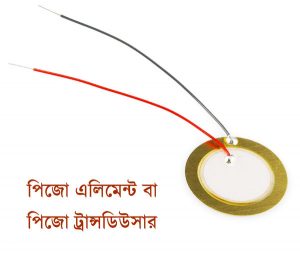
The second method is to use piezo element ( piezo element aka piezo transducer ).

In the figure - piezo element
Where it usually takes very small and thin speakers, the piezo element is used. For example, there are some greeting cards that can be used to listen to music as soon as they are opened, using the piezo element as a speaker. There is a type of microphone called contact microphone, which is used to record the sound of musical instruments like drums, guitars, etc. It also uses piezo elements.
One of the features of the piezo element is that when it changes shape, electricity is generated. For example, if you press a circular piezo element with your hand, the shape of the piezo will change and become slightly flattened, and then electricity will be generated. However, AC power is generated from the Piezo element, so you need to make a rectifier with a diode and convert the AC to DC.
Application of this project:
This project can be applied in different places. E.g.,
- Placing a piezo element under the carpet will generate electricity as soon as someone walks on the carpet.
- The electricity generated by placing piezo elements on the pavement can be supplied to the street lamp post. Or
- Mobile / power bank etc. can be charged with the electricity generated by placing piezo element in the sole of the shoe.
Below is an image of a foot walking charger that is still being tested.
Special note here -
- If you use more than one piezo element, you have to connect in parallel. Otherwise, it will not work if all the piezo are not pressed together. And,
- The amount of electricity generated should be increased or decreased as required using a voltage regulator / boost converter and the output noise should be filtered with a capacitor.
- The electricity generated here will be very small.
Materials required for this science project:
- 1. Piezo Element / Piezo Transducer
- 2. 4 diodes (e.g. 1N4007) - for making bridge rectifiers
- 3. Cotton / foam
Electrical connection method:
Below is how to connect the piezo elements to the bridge rectifier-

The output DC can be converted to suitable load by converting it with suitable capacitor, voltage regulator or speech converter. You can read our power supply section for such power supply circuit .
Science Project - 2 - Amplifier without power for mobile phones

We know that amplifiers can amplify or amplify audible sounds . This amplification work can be done without the amplifier if desired. Now I am writing about a very interesting project.
Necessary materials:
- 1. Paper pipe, PVC pipe or any other pipe inside the toilet paper roll which is 2-3 inches in diameter
- 2. Disposable plastic cups
- 3. Marker pen or pen / pencil
- 4. Scissors / Cutters
All we have to do to make this science project:
- Make a hole in the bottom of 2 plastic cups. The hole should be such that the pipe we take can enter easily.
- One end of the paper pipe we took (even if it is another pipe) has to be inserted through a hole in the cup.
- Put another cup on the other end of the pipe in the same way.
- Make a hole the size of the phone in the middle of the pipe and insert the speaker of the phone in that direction.
- The sound coming out of the speaker will be amplified in a plastic cup. The amount and quality of sound can be increased by increasing or decreasing the size of cups and pipes.
Estimated cost - maximum 60 rupees
Advantages:
- All other amplifiers require electricity to run but it does not require electricity to run
- Mobile can increase the noise about 3-10 times without any kind of circuit or modification. Pipes of different lengths and large sized cups can be used if required.
Disadvantages:
- Not easily portable.
Science Project - 3 - Electric Soldering Iron
We often suffer from soldering iron. Cheap soldering iron is out of the question. After a few days, the iron bit has to be changed or the iron heating coil is cut. But today I will talk about a method that if you use the series lamp will not have to use but will save half the electricity. At the same time cheap soldering iron will last for many days.
Necessary materials
- 1. Diode (e.g., 1N4007 / 1N5403)
- 2. AC switch with appropriate current rating
How to create and use?
- A 1N4007 / 1N5403 diode should be fitted in series at one end of the AC soldering iron . Any one of the AC lines must be wired.
- A switch should be fitted in parallel with the diode.
- The switch must be turned on when the soldering iron is first turned on. The iron will heat up quickly.
- When the soldering iron is hot, the switch should be turned off. Then less electricity will go to the soldering iron as electricity flows through the diode. But since the soldering iron is already hot, the temperature of the iron will remain the same even if less power is lost.
Connecting Circuit Diagram:
Looking at the image below, I hope you understand what the whole system will be like-

Power saving soldering iron works
If we look at the connection diagram above, we can see that a diode is connected in parallel with the K switch. Then it is attached to the soldering iron in series.
The switch was originally used to shorten the diode. Because to separate the original 2 waves in the AC sine wave.
As a result of this system, the soldering iron T is rectified at 220 volts AC to 110 volts DC when switched off.
Since soldering iron is a resistive load type, this pulsating DC also works very well and the iron runs at half its full capacity (60 watts to 30 watts).
The advantage of this is that if the soldering iron needs to be heated as quickly as needed (when it is cold at the beginning or to solder something thick) then the switch can be heated quickly by turning the switch on or off.
When it is hot enough, then when the switch is turned off, the Tatal T gets 110 volts through the diode or runs at half power.
If desired, the diode and the switch can be used together by placing them in a bed switch . In that case the bed switch TE will make this switch work.
Advantages:
- Saves a lot of electricity
- Soldering protects the iron bit from rapid corrosion
- Quickly prevents the iron coil from being cut
- Cheap soldering prolongs the life of iron
- If you use it, you don't have to use series lamps or series boards separately.
- High watt soldering iron can also be used in low watts. For example, it is possible to use 60 watt iron as 40 watt.
This method can save half the electricity of soldering iron. And it works even if you don't use series lamps
This method can be tried on devices that act like soldering irons under resistive loads ( such as irons, heaters, filament bulbs ). However, depending on the power demand of the device, the correct diode must be given.
Science Project - 4 - Glowing water

Ingredients needed for glowing water
- 1. Highlighter pen
- 2. Ultraviolet LED or ultraviolet light source.
That highlighter pen is available at stationery stores. One of the features of their ink is that if the ink is left in the dark and ultraviolet rays are thrown at it, the ink will start to glow in the dark with its own color . For example, green hailaitarera ink when ultraviolet rays will shine green, yellow ink when yellow shall shine.
Hailaitarera advantage of this ink exploring gloyim water or in the dark Everything Everything that would water / colors can be made.
Everything you need to do to make glowing water:
- That's why you need to collect a highlighter pen first.
- The part with which the nib / ink comes out, it has to be removed with pliers or something else.
- Then soak the highlighter pen in a little water for a few minutes. Now when ultraviolet rays fall on this water, the water will glow.
Ultraviolet light (also known as blacklight) purchased from the market can be used as an ultraviolet ray or can be made yourself. 20-30 UV (Ultraviolet) LEDs can be soldered on a circuit board to make an ultraviolet torch.
Painting pictures on walls, glass, paper with this glowing water will look great even if you put UV rays in it in the dark. The picture below shows the painting on the wall with glowing water-

Science Project - 5 - Easily Make Earthquake Detectors!
Seismographs are commonly used to determine the magnitude of an earthquake. A seismograph can be easily made with some simple things. Below is a picture of such a simple seismograph device-

But if you just want to make an instrument to understand if an earthquake is happening, you can do it more easily.
- Take a glass of water.
- Place the glass in a place that is easily visible from any corner of the room.
- If you think there is an earthquake, look at the glass.
- If there is an earthquake, the water will continue to move here and there. And if there is no earthquake, the water will remain still.
If you wish, you can make this project more interesting by installing an alarm .
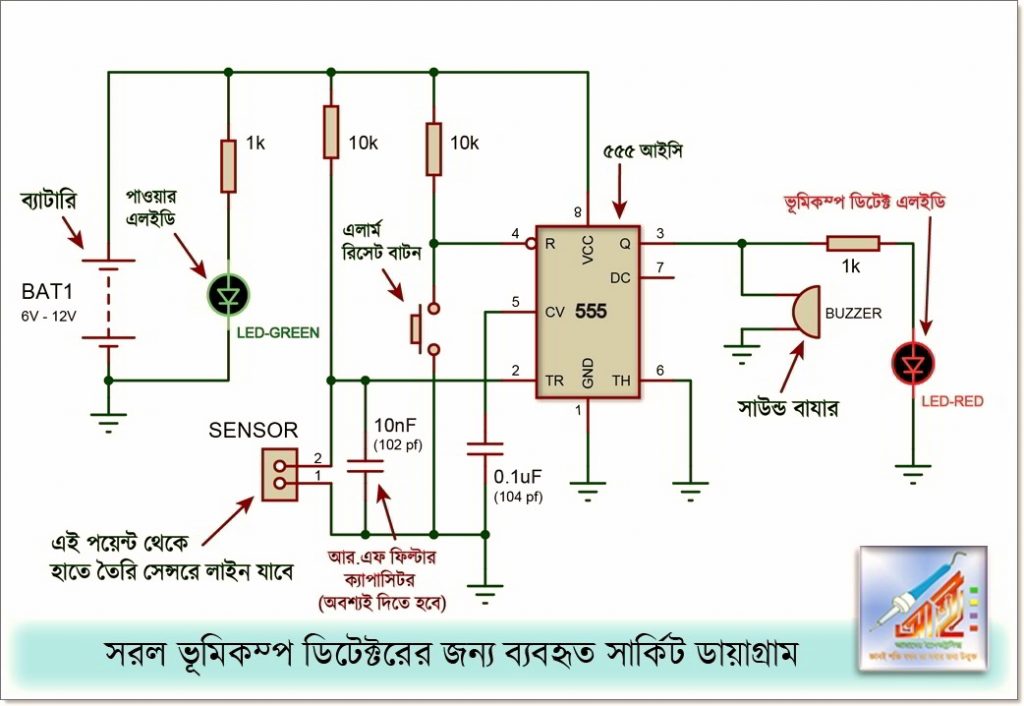
Alarm circuit for seismic detector - 1

In that case the above circuit diagram has to be followed. Pull a wire from the point marked " B" and immerse it in water. And one of the " A" points half a centimeter above the water level should be applied with hot glue / any other strong glue as shown in the figure below.

If water moves during an earthquake, water will come to the " A" point wire and then A and B points will be shorted and the alarm will sound and you will understand that the earthquake is happening.
Note that -
- Remove the plastic of the two wires, take out the copper part and put solder there. Otherwise the copper will be damaged due to contact with water. Then the efficiency of the device will be reduced.
- Care should be taken not to glue the soldered part of the A point wire.
- The battery should be checked regularly and replaced when the battery is low.
Advantages:
- Can be built quickly
- Easy to make
- Low cost
Disadvantages:
- Water and batteries have to be taken care of every day
Alarm circuit for seismic detector - 2
Below is the alarm circuit used for an earthquake detector tested in our electronics lab-

This circuit is close to the previous circuit but has additional power LEDs and Earthquake Detect LEDs. One circuit will light up as soon as it is powered and the other will ignite if it detects an earthquake or extra movement in the sensor and at the same time will sound the alarm .
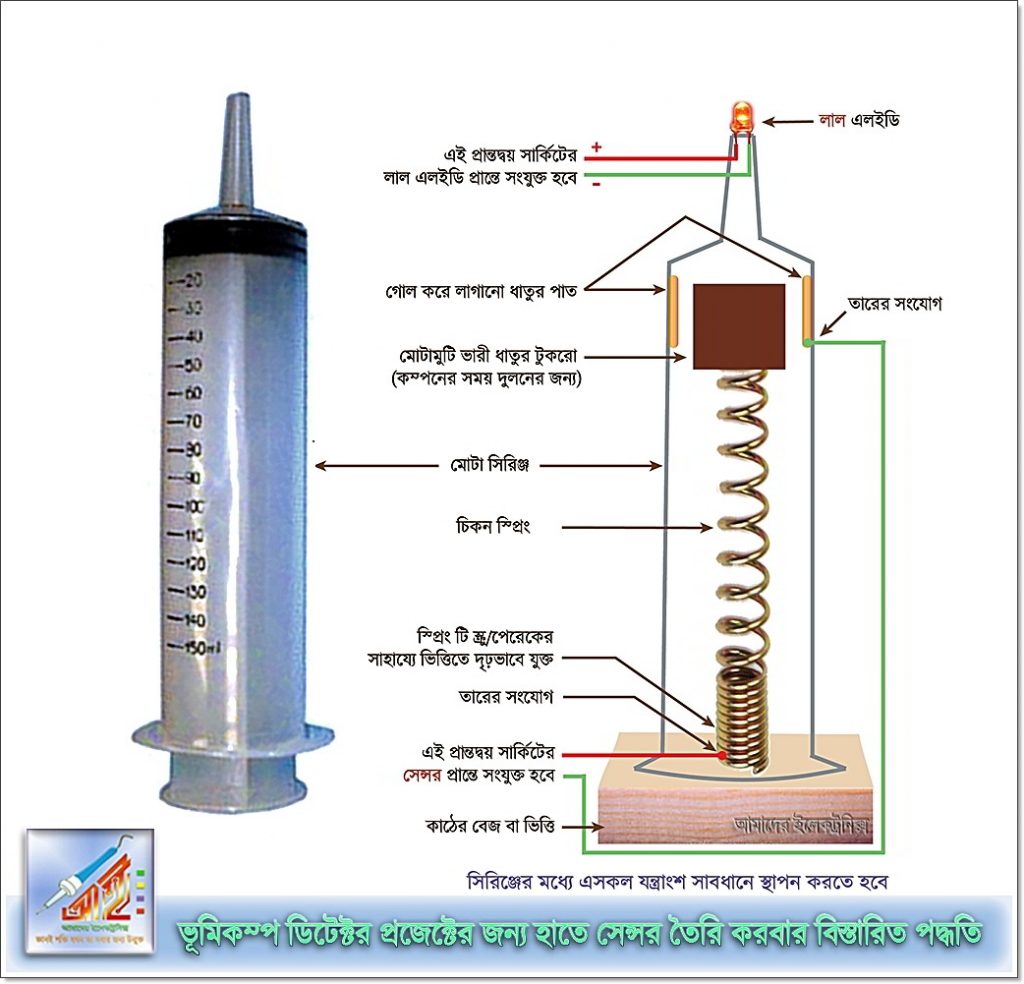
Made sensors used for seismic detectors
Sensors for this Earthquake Detector or Earthquake Alarm Circuit need to be made by hand. This requires a thick syringe, a spring, a metal sheet and some intelligence. Arrange the whole system as shown in the picture below-

Note that if you do not have a long spring, you can also use a coil with a thick heater.
Lab notes
The device had a false triggering problem while testing in our electronics lab . Originally, the 2nd trigger pin of 555 IC was very sensitive and there was such a problem . To overcome this, an RF filter capacitor must be used between pin 2 and ground. And the cable connecting the sensor to this circuit should not be given too long.
When the whole project is finished, it will look like this-

Testing video of the project
A test video of this seismometer has been posted on our Electronics YouTube channel. Watching the video will hopefully help you understand how this seismic detector works. If you subscribe to our electronics channel, you will find many more videos up front. Watch the testing video below-
Special knowledge
This tutorial video shows how to create an Earthquake alarm and turn on the LED through a simple circuit. If you wish, you can add some more important parts to it, such as-
- As soon as there is an Earthquake, important things like special equipment, gas line connection, bank vault etc. are shut down.
- Launch a special service as soon as Earthquake occurs
- As soon as it happens, it is important to send SMS or emergency warning messages to the mobile, etc.
This project can be done in many more ways. Such as using mercury tilt switches, glass water, lasers, gyrosensors, and so on. However, since its purpose is to inspire students in science, it has also been shown to make sensor survival by hand.
Some important tips for science fairs
Preparation before taking part in the science fair
- No matter how simple the project is, you have to prepare at least 1 month in advance and complete the project before the registration of the science fair.
- If possible, I have to fix myself with a deadline that I will finish the project within this time before registering for the science fair. Otherwise, if you think that you have a lot of time on your hands and work slowly, you will see that the project has to be done in a hurry towards the end. So time management is very important .
- Regular notes should be kept on the progress of the project while conducting the research , and scientific methods should be followed while conducting the research.
- You need to know the details of the subject you are participating in the science fair . It is as if the jury does not seem to be stuck with various questions.
- Must have accurate knowledge about the theoretical and practical aspects of the subject displayed .
- Necessary mathematical and scientific explanations should be kept at hand so that it can be displayed if the judges want. If necessary, the book should be ready to be shown again in pen.
Preparation for presentation at science fair
- Don't panic. Attitude that has not been awarded the Science Project as well have been able to present on the expedient to satisfy desire to do so.
- You have to prepare well for the presentation . As if the judges or the spectators could not stop him by asking any question.
- Judges often ask the wrong questions and check the merits of the participants in the science fair . We have to keep a watchful eye on that too.
- Most science fairs have separate numbers for posters. So we have to make posters.
- The name of the project should be written in large letters on the poster and the whole poster should be of such a size that every text can be read well from a distance of 8 feet.
Hopefully, any project will be very interesting if it is presented in the science fair following the above rules. I find great pleasure in the course of the 5 project as the project's nice to create your own 😀


No comments:
Post a Comment